[Ainize] : Resume Generator
[TabTab] : TabTab!
[Teachable NLP] : Model
We made a model with Teachable NLP, but it is hard to make web service using the model from beginning to end. Obviously, we just need a simple web page, not special one.
In that case, Open source Opyrator will be extraordinarily useful.
What is Opyrator?
Turns your machine learning code into microservices with web API, interactive GUI, and more.
 Turn functions into production-ready services within seconds.
 Auto-generated HTTP API based on FastAPI.
 Auto-generated Web UI based on Streamlit.
 Save and share as self-contained executable file or Docker image.
 Reuse pre-defined components & combine with existing Opyrators.
 Instantly deploy and scale for production usage.
Opyrator makes microservices with only a few codes of Python functions.
It is based on FASTAPI which is a fast framework for building API and Streamlit which is a frame work specialized for Machine Learning and creates beautiful app.

Moreover, FastAPI creates API documentation by itself!

Let’s find out how it works!
1. Brainstorming
I’m going to make a service using a model, Résumé For SW Developer, that I made with Teachable NLP previously. The service generates 3 sentences after we enter the prefix text and length. We can choose one of the most favorite sentences.

2. Installation
pip install opyrator
A lot of Machine Learning packages in addition to streamlit, fastapi will be downloaded followed by the command. So I recommend to use virtulenv, venv.
3. Directory
The program works with a single Python file, a single function.
├────resume
	├ app.py
	├ requirements.txt
	├ .dockerignore
	├ .gitignore
	├ Dockerfile
4. Models
Opyrator is based on FastAPI, and FastAPI is based on Pydantic Model. So we can check out data like Pydantic Model. Pydantic works above Python 3.6, and validates the data by using Type Hints. Every Model inherits BaseModel, and simply looks like below.
from pydantic import BaseModel

class Foo(BaseModel):
    count: int
    size: float = None

class Bar(BaseModel):
    apple = 'x'
    banana = 'y'
In Opyrator, we can use data through the class. See below for more details.
 If you don’t specify the title in Field function, the field name is set to varaible name.
In case of that, the first letter of field name will appear to upper case.
Use _(underbar) for whitespace in the field name.
from pydantic import BaseModel, Field

class TextGenerationInput(BaseModel):
    text_input : str = Field(
        ...,
        title = "Text Input"
        description = "The input text to use as basis to generate resume.",
        max_length = 30,
    )
    length : int = Field(
        10,
        title = "Length"
        description="The length of the sequence to be generated.",
        ge=5,
        le=50,
    )

class TextGenerationOutput(BaseModel):
    output_1 : str
    output_2 : str
    output_3 : str
I defined the input through TextGenerationInput, output through TextGenerationOutput. You can specify the data with Field function. To briefly describe the fields in the model above,
- … (ellipsis) : To indicate the field is required
- title : if omitted, field_name.title() is used
- description : if omitted and the annotation is a sub-model, the docstring of the sub-model will be used
- max_length : for string values, this adds a corresponding validation and an annotation of maxLength to the JSON Schema
- ge : for numeric values, this adds a validation of “greater than or equal” and an annotation of minimum to the JSON Schema
- le : for numeric values, this adds a validation of “less than or equal” and an annotation of maximum to the JSON Schema
- default : (a positional argument) the default value of the field. Since the Field replaces the field’s default, this first argument can be used to set the default.
[Input]


[Output]

5. Function
Link the Models with generate_resume function. Input Moel is a parameter , and Output Model is specified with → . You can access the fields of Models with dot(.) (e.g. input.text_input, input.length) Please refer to here to know the API for more details.

def generate_resume(input: TextGenerationInput)-> TextGenerationOutput:
    """Generate Résumé based on a given prompt. And choose one of the best sentences. """
    encoded = autoTokenizer.encode(input.text_input)
    data = {
        'text' : encoded,
        'length' : input.length,
        'num_samples' : 3
    }
    response = requests.post(url, data = json.dumps(data) , headers = {"Content-Type":'application/json; charset=utf-8'})
    if response.status_code == 200:
        text = dict()
        res = response.json()
        for idx, output in enumerate(res):
            text[idx] = autoTokenizer.decode(res[idx], skip_special_tokens = True)
        return TextGenerationOutput(output_1 = text[0], output_2 = text[1], output_3 = text[2])
    else:
        return TextGenerationOutput(output_1 = response.status_code)
6. Docker
I’ve made the service and I’m going to deploy it to ainize that makes it possible to deploy projects with a single Dockerfile!
FROM tensorflow/tensorflow:1.15.5-gpu-py3
RUN mkdir -p /app
WORKDIR /app
COPY . .
RUN apt-get update && \
    apt-get install -y
RUN pip install --upgrade pip
RUN pip install --no-cache-dir -r requirements.txt
EXPOSE 8501
CMD ["opyrator", "launch-ui", "app:generate_resume"]
-
FROM: ainize supports GPU. So I chose tensorflow based on GPU as base image. -
RUN: Execute the commands. I installed pip packages mentioned in requirements.txt.In that file, I enumerated
requests, transformers와 opyrator, watchdog. -
EXPOSE: Opyrator uses 8501 default port. -
CMD: Run Command. Opyrator is executed byopyrator launch-ui filename:function- If you want to get swagger UI, Run
opyrator launch-api filename:function
- If you want to get swagger UI, Run
And then, build docker and run after complete Dockerfile.
-
Build: docker build -t resume(image) -
Run: docker run -it -p 8501:8501 resume:latest(image)
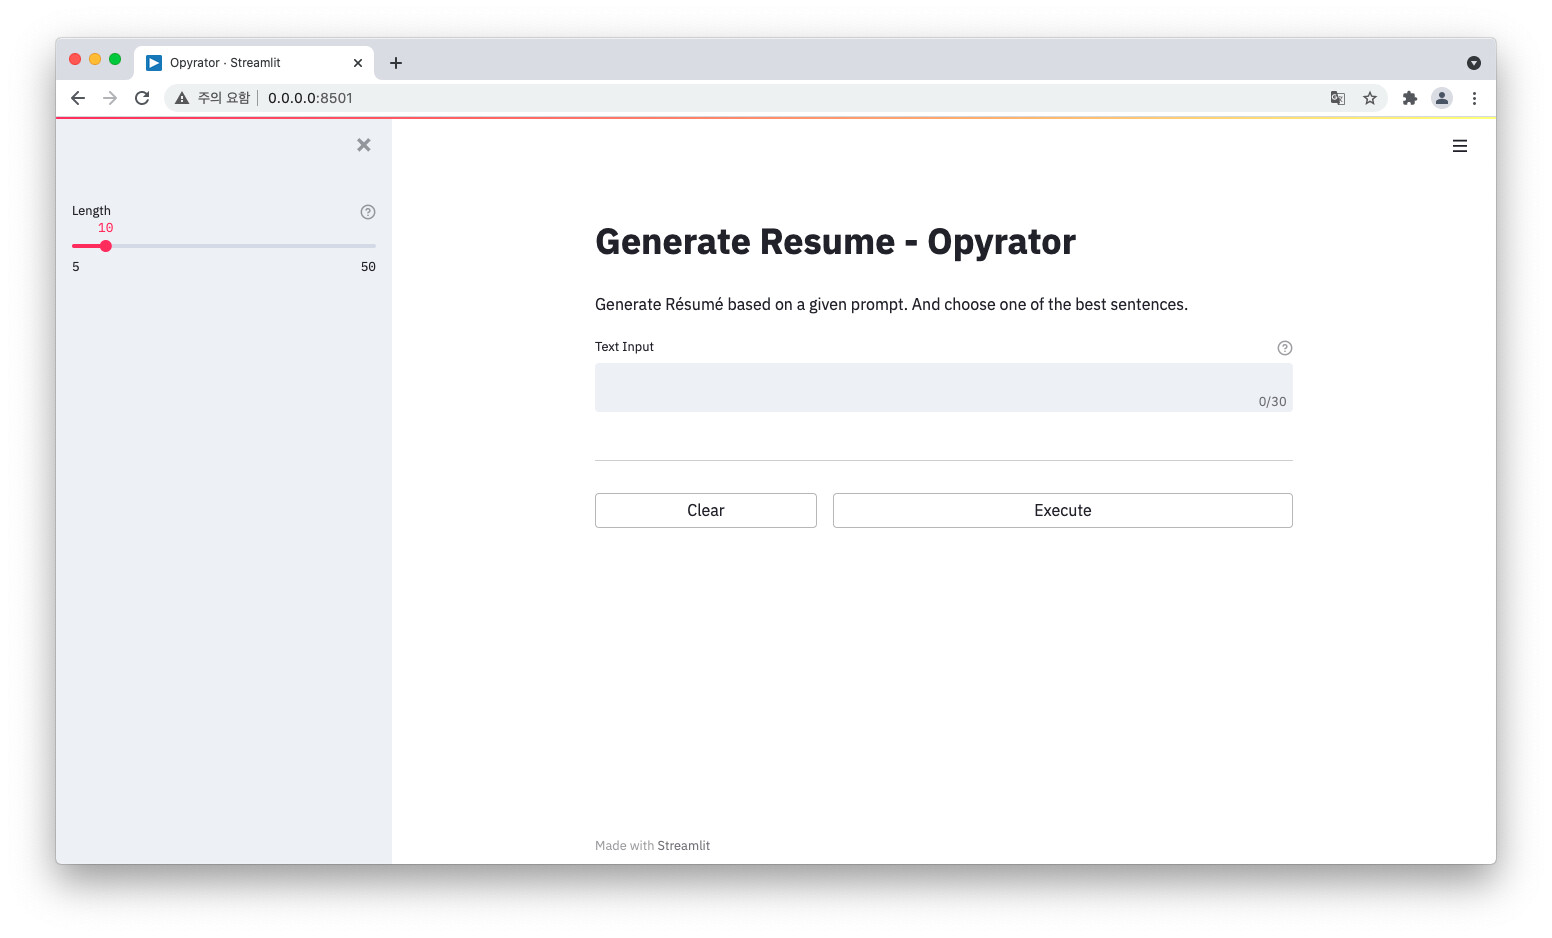
In Chrome browser, connect to 0.0.0.0:8501 . Opyrator works successfully!
- In other browsers like Safari, it doesn’t work.
7. Swagger
After deploying the project to ainize, you can upload API documentaition, Swagger to notice API. Opyrator serves it automatically by running launch-api, not launch-ui .
(If you built virtualenv by docker container, please modify dockerfile to EXPOSE 8080 and rebuild it.)
opyrator launch-api app:generate_resume
You can text API regardless of the web page, and get the source of Swagger by clicking ./openapi.json .

Save it to Swagger.json or conver it to Swagger.yaml. And upload it to API tab in ainize to test API in ainize.

In order to make it, you need to change the server url as the protocol of running launch-ui and launch-api is different. If you don’t apply the server url,
403 Forbidden error appears.
I found out a way to solve the problem. Both launch-ui and launch-api are running on each server. So the Resume Generator service is running on launch-ui , however, the swagger is based on the server url of launch-api . So I added server url to Swagger like below.
openapi: 3.0.2
servers:
  - url: 'https://master-resume-api-dleunji.endpoint.ainize.ai'
info:
  title: Generate Resume - Opyrator
  description: 'Generate Resume based on a given prompt. And choose one of the best sentences. '
  version: 1.0.0
...
8. Wrap Up
Opyrator is a useful open source for whom hesitates to make a whole web page for API and service. Currently, the developer of Opyrator is making more features for Opyrator, so it will be more powerful.
Please show me your idea implemented with Teachable NLP, ainize and Opyrator in the forum!
